Creating a Translation Job
2 minute read
The first step in sending content for translation is creating a translation job.
To create a new translation job:
- Select Merchant Tools > Products and Catalogs > Translation from the menu.
The Manage Translation Jobs page opens.
![]()
- In the top-right corner of the page, click Create Job.
The General tab of the Job Information page opens:
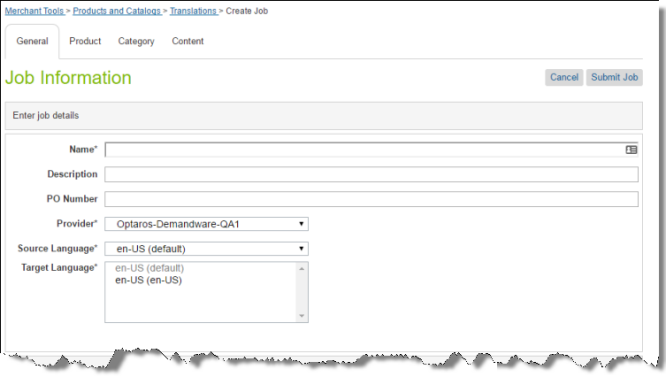
- In the Enter job details section, enter the following information about your job:
| Field | Description |
|---|---|
| Name | Your name for the translation job. |
| Description | Optional. Your description of the translation job. |
| PO Number | Optional. The purchase order reference number associated with this job. |
| Provider | Select the translation provider for this job. |
| Source Language | Select the source language for this job. The Cartridge will send items in this source language for translation. The list displays all locales selected in the Locales page. To open this page, select Merchant Tools > Site Preferences > Locales from the menu. |
| Target Language | Select all the target languages into which you want to translate the source content in this job. The list displays all locales selected in the Locales page. To open this page, select Merchant Tools > Site Preferences > Locales from the menu. Tips: To select a range of adjacent language, press the Shift key. To select multiple non-adjacent languages, press the Ctrl key. |
- Next, you select the type of content to include in the translation job.
- To add products from a catalog or all products in a catalog to the job, click the Product tab. For details, see Adding Products and Catalogs to the Job.
- To add categories of products to the job, click the Category tab. For details, see Adding Categories of Products to the Job.
- To add static website content to the job, click the Content tab. For details, see Adding Static Website Content to the Job.
Note: You can include content from multiple tabs in a single translation job.