Adding a User
4 minute read
You can individually add an Oracle Eloqua user to the Lionbridge App so that you can add the user to one or more teams. This enables the user to send assets for translation from and to specified languages and to specified translation providers.
Individually adding an Oracle Eloqua user to the Lionbridge App is useful if you want only a few Oracle Eloqua users to access it.
Important: Before setting up users and teams, read Configuring User Access.
To add a user:
- In the Site Administration menu on the left, click Site Users.
The Site Users page opens, displaying the users set up for your Oracle Eloqua site. For detailed information about this page, see Managing Users.
- Click New User.
The New User dialog box opens.
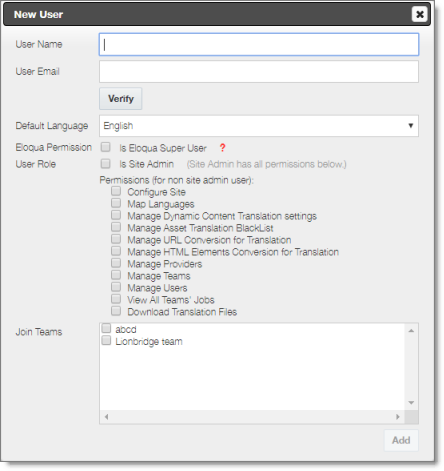
- Enter the following information to identify the new user:
| Field | Description |
|---|---|
| User Name | Enter the user’s username for accessing the Lionbridge App. This must be exactly the same as the user’s username for accessing Oracle Eloqua. It is not case sensitive. |
| User Email | Enter the user’s email address. This must be exactly the same as the user’s email address for accessing Oracle Eloqua. It is not case sensitive. |
- Click Verify. The App checks whether there are any users with the same or similar name already in Eloqua.
- If the App finds one user with the same or a similar name in Eloqua, it updates the record with the name and email address specified here. The Add button, described below, is enabled.
- If the App finds multiple users with similar names in Eloqua, it uses the email address specified here to match with the correct user. It then updates the record with the name specified here. The Add button, described below, is enabled.
- If the App does not find a user with a similar name in Eloqua, the Add button, described below is not enabled.
Recommendation: Add the user to Eloqua before adding the user to the App. Alternatively, after adding the user to Eloqua, import the user to the App. For detailed instructions, see Importing Users.
- If the App finds a user with the same or a similar name in Eloqua, but this user already exists in the App, then the Add button, described below, is not enabled.
- Enter the following additional information about the new user:
| Field | Description |
|---|---|
| Default Language | In the dropdown list, select the default language in which the Lionbridge App interface is displayed for the user. If the user is a site administrator, who can access the functionality described in this guide, then this is the language in which the CloudBroker interface is displayed for this user. Languages are configured in CloudBroker by the Lionbridge Connector Team. For more information, please contact Lionbridge Connector Support, as described in How to Contact Lionbridge Connector Support. |
| Eloqua Permission | Indicates whether this user is an Eloqua superuser. If a user who submitted a translation job does not have sufficient permissions to return the translated content to Eloqua, then the App uses the Eloqua superuser’s credentials to return translated content to Eloqua. * If the user is an Eloqua superuser, select the **Is Eloqua Super User** check box. * If the user is not an Eloqua superuser, clear the **Is Eloqua Super User** check box. |
| User Role | Indicates whether this user is a site administrator, who can access CloudBroker to set up the Lionbridge App, as described in this guide. * If the user is a site administrator, select the **Is Site Admin** check box. * If the user is not a site administrator, clear the **Is Site Admin** check box. If the user is not a site administrator, you can grant the following administrative permissions to the user by selecting the corresponding check boxes: * **Configure Site**: configure your site, in the **Site Configuration** dialog box. * **Map Languages**: configure language mappings, in the **Language Mapping** dialog box. * **Manage Dynamic Content Translation settings**: configure translation settings for dynamic content, in the **Site Extension** dialog box. * **Manage Providers**: configure translation providers, in the **Site Providers** page. * **Manage Teams**: manage teams, in the **Site Teams** page. * **Manage Users**: manage users, in the **Site Users** page. * **View All Teams' Jobs**: view the translation jobs for all teams, in the **Site Jobs** page. Otherwise, the user can view jobs only for the teams to which the user is assigned. * **Download Translation Files**: download source and target XML translation files, in the **Job Details** tab of the Translation Jobs page. |
| Join Teams | Select the check boxes of the teams the user is joining. A user must belong to at least one team to be able to send out content for translation. The team determines which source and target languages the user can send out for translation and the translation providers to which the user can send the content. You can view the settings for all teams on the Site Teams page. For details, see Managing Teams. |
- Click Add.