Managing Users
2 minute read
Eloqua users can access Lionbridge App to send, monitor, and review translation jobs.
Important: Before setting up users and teams, read Configuring User Access.
To manage users:
- In the Site Administration menu on the left, click Site Users.
The Site Users page opens, displaying the users set up for your Oracle Eloqua site.
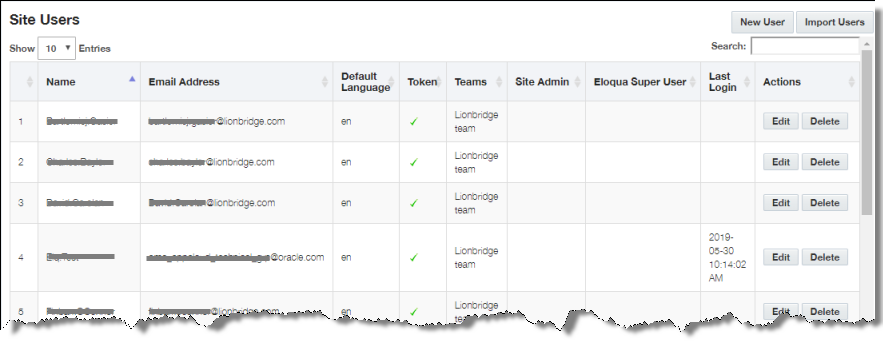
This page displays the following information about each user:
| Column | Description |
|---|---|
| Name | The name of the user. |
| Email Address | The email address of the user. |
| Default Language | The default language in which the Lionbridge App interface is displayed for the user. If the user is a site administrator, who can access the functionality described in this guide, then this is the language in which the CloudBroker interface is displayed for this user. |
| Token | A checkmark indicates whether this user has an active token for authentication to Eloqua. |
| Teams | The teams to which this user belongs. The team determines which source and target languages the user can send out for translation and the translation providers to which the user can send the content. |
| Site Admin | A checkmark indicates whether this user is a site administrator. Site administrators can access CloudBroker to set up the Lionbridge App, as described in this guide. |
| Eloqua Super User | A checkmark indicates whether this user is an Eloqua superuser. If a user who submitted a translation job does not have sufficient permissions to return the translated content to Eloqua, then the App uses the Eloqua superuser’s credentials to return translated content to Eloqua. |
| Last Login | The time and date when the user last logged into the App, in the following format: YYYY-MM-DD hh:mm:ss AM/PM.. |
- Do one of the following:
- To create a new user, click New User. For detailed instructions, see Adding a User.
- To import users, click Import Users. For detailed instructions, see Importing Users.
- To edit a user, in the Actions column, click Edit in the corresponding row. For detailed instructions, see Editing a User.
- To delete a user, in the Actions column, click Delete in the corresponding row. For detailed instructions, see Deleting a User.