Configuring Country and Language Metadata Replacement
4 minute read
You can configure the Lionbridge App to replace the following metadata properties in assets you send out for translation:
- country metadata. For example, you can replace <meta property=“wap:country” content=“us”/> with <meta property=“wap:country” content=“jp”/>.
- language metadata. For example, you can replace <meta property=“wap:language” content=“en”> with <meta property=“wap:language” content=“ja”>.
Note: You can replace the country metadata, the language metadata, or both.
To configure replacement settings for country and language metadata:
-
In the Site Administration menu on the left, ensure that My Site is selected, so that the My Site page is open. This is the default selection when you log into CloudBroker as a site administrator. For detailed information about this page, see Viewing Lionbridge App Information and Usage Data.
-
In the Site Extensions section, click Configure for the HTML Elements Conversion for Translation site extension.
The Site Extension dialog box opens, displaying the HTML Element Conversion tab.
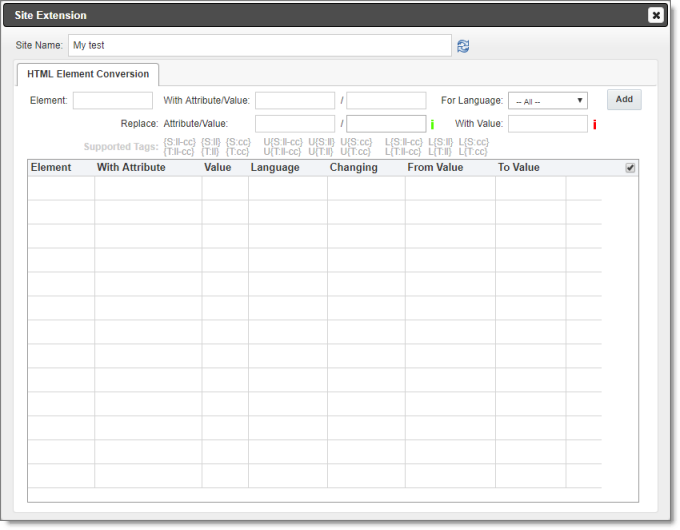
- Enter the following information about the metadata properties to replace:
| Field | Description |
|---|---|
| Element | The type of HTML element in which to replace an attribute value, for example, meta. |
| With Attribute/Value | The attribute/value pair in the source version of the asset. In the first field, enter the attribute and in the second field, enter the value to be replaced. For example: * In the first field enter property, and in the second field enter wap:country.* In the first field enter property, and in the second field enter wap:language. |
| For Language | Select the language code for which the replacement will occur, or accept the default, so that the replacement will occur for all languages. |
| Replace Attribute/Value | The attribute/value pair in the target version of the asset. In the first field, enter the replacement attribute. In the second field, enter the replacement value. If you leave this blank, then all values of the specified attribute will be replaced. |
| With Value | Required. Specify the format of the replacement value or values, which is one or both of the country and language metadata. To specify the format of the replacement value or values, enter a building block from the table below. |
| Building Block | Description | Example |
|---|---|---|
| {S:ll-cc} | The language code and the country code of the source language, separated by a hyphen. | en-CA |
| {S:ll} | The language code only of the source language. | en |
| {S:cc} | The country code only of the source language. | CA |
| U{S:ll-cc} | Upper case of the language code and the country code of the source language, separated by a hyphen. | EN-CA |
| U{S:ll} | Upper case of the language code only of the source language. | EN |
| U{S:cc} | Upper case of the country code only of the source language. | CA |
| L{S:ll-cc} | Lower case of the language code and the country code of the source language, separated by a hyphen. | en-ca |
| L{S:ll} | Lower case of the language code only of the source language. | en |
| l{S:cc} | Lower case of the country code only of the source language. | ca |
| {T:ll-cc} | The language code and the country code of the target language, separated by a hyphen. | fr-CA |
| {T:ll} | The language code only of the target language. | fr |
| {T:cc} | The country code only of the target language. | CA |
| U{T:ll-cc} | Upper case of the language code and the country code of the target language, separated by a hyphen. | FR-CA |
| U{T:ll} | Upper case of the language code only of the target language. | FR |
| U{T:cc} | Upper case of the country code only of the target language. | CA |
| L{T:ll-cc} | Lower case of the language code and the country code of the target language, separated by a hyphen. | fr-ca |
| L{T:ll} | Lower case of the language code only of the target language. | fr |
| L{T:cc} | Lower case of the country code only of the target language. | ca |
- Click Add.
The specified metadata-replacement settings are added to the bottom of the tab.
- Repeat steps 3 and 4 for each metadata-replacement setting you want to specifiy.
Tips: To edit a metadata-replacement setting, click the Edit icon
. To delete a metadata-replacement from the list, click the Delete icon
. By default, a confirmation message is displayed before you can delete a setting. If you do not want to receive a confirmation message, clear the check box in the column header above the Delete icons.