Sending Assets for Translation from the Translation Queue
7 minute read
The goal of the Translation Queue (queue) is to control translation costs and the translation process. You can send out one, multiple, or all assets from the Translation Queue at one time.
Submitting content to the Translation Queue before sending it out for translation has the following advantages:
- You may not want to send out each asset individually as soon as you finish reviewing it. The Translation Queue facilitates your management of reviewed assets, so that you do not forget about sending individual reviewed assets for translation.
- Your translation provider may prefer receiving fewer but larger batches of items to translate, rather than individual assets, as it facilitates project preparation, resource assignment, and file analysis.
- If you want to translate many assets into multiple languages, but you want to translate into only one target language at a time, this is a good way to manage that process.
- The Translation Queue manager may want to route jobs to certain translation providers.
- The Translation Queue manager may want to add job-specific metadata, such as a purchase order number.
If you or your colleagues have added items to the Translation Queue, you must access it and send out the items from there.
Notes: Assets in the queue are actually just pointers to the assets in Marketo. If you modify an asset within Marketo after adding it to the queue, those changes are included in the version sent out for translation. If you do not send out items from the Translation Queue, the Lionbridge App does not send them out for translation.
To send out assets for translation from the Translation Queue:
-
Sign in to the Lionbridge App. For details, see Getting Started with the Lionbridge App for Marketo.
-
In the Lionbridge App for Marketo menu on the left, select Translation Queue.
![]()
The queue displays all the assets that were collected and added to the Translation Queue that have not yet been sent out for translation. The bottom-left corner below the list displays the number of items displayed on the current page and the total number of items in the queue.
By default, the items are sorted in reverse chronological order by the Creation Date column.
The following information is displayed about each asset in the queue:
| Column | Description |
|---|---|
| Item Name | The Lionbridge App’s name for the asset in Marketo. |
| Source Language | The source language of the asset. |
| Target Language | The target language into which to translate the asset. This was specified when the asset was added to the queue. Note: If you specified translating an asset into multiple target languages, then each instance of a source language-target language pair is displayed in a separate row in the table, as a separate item. |
| Asset Type | The type of asset in Marketo. |
| Asset ID | Marketo’s unique identifier for this asset, for example, the snippet ID or the email ID. |
| Creation Date | The date and time when this asset was added to the queue, in the following format: YYYY-MM-DD hh:mm:ss AM/PM. |
| Created By | The username of the user who added this asset to the queue. |
- Optional. You can do one or more of the following to facilitate displaying the items you want to see in the queue:
- You can specify how many items to display in a page. Above the top-left corner of the list, select the number to display from the Show X Entries list.
- You can use the Search box above the top-right corner of the list to search for a specific item in the list or to filter the list. As you type into the Search box, the Lionbridge App automatically searches for matches across all columns and displays only the matching columns. For example, you can type de-DE to display only assets where the source or target language is German. Alternatively, you can type email to display only Email assets.
Note: The search feature filters all items in the queue, not only those displayed on the current page.
- If there are many items in the queue, it may have multiple pages. The navigation bar below the list helps you navigate through the pages and displays your position in the queue. Click Previous Page, Next Page, or a page number to navigate to the corresponding page.
- To sort the items in the queue by a different column, click the corresponding column header.
- To reverse the sort order of a column, click the column header.
- Select the check boxes of the items that you want to send out for translation as a single translation job.
The assets you select should have the following in common:
- You want to send them to the same translation provider.
- You want to apply the same translation settings to them (described in step 5, below) and you want them to be part of the same translation job.
Note: You can select items with different source-target language pairs. For example, you can include items for translation from English to French along with items for translation from German to Japanese.
Note: The total number of selected items is displayed in the top-right corner of the page.
- Click Send Out Selected Items.
The Send Out Queued Items dialog box opens.
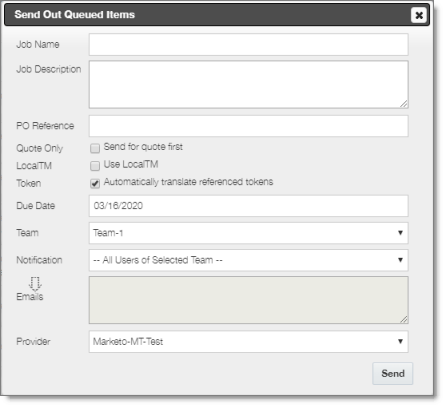
Enter the following information about this translation job:
| Field | Description |
|---|---|
| Job Name | Your name for this translation job. The Lionbridge App sends this information to your translation provider. |
| Job Description | Your description of this translation job, including any special instructions or requests. The Lionbridge App sends this information to your translation provider. Note: This field will not be displayed if the Lionbridge App is configured to hide it. |
| PO Reference | Optional. The purchase order reference number, if relevant. Note: Depending on your company’s configuration, this field may have another name, and it may be either a freeform text field or a dropdown list with pre-configured entries available for selection. |
| Quote – Send for quote first | Select this check box to inform the translation provider that you want to receive a quote before the translation process starts. |
| LocalTM – Use LocalTM | Select this check box to check whether content was already translated before sending it out for translation. The Lionbridge App sends out only changed content for translation. If content was previously translated and it has not changed, then the Lionbridge App does not send it for translation again: Instead, it uses the stored translation. This feature reduces the quantity of content that the Lionbridge App sends to translation providers, which reduces your cost. However, it increases the processing time before sending out the content for translation. |
| Token – Automatically translate referenced tokens | Select this check box to include all referenced tokens in the translation job. |
| Due Date | The requested translation deadline. This is the date when you expect the translated content to return. By default, it is two weeks from the current date. To select a different date, either type the delivery date in the field in MM/DD/YYYY format, or click in the field and select a different date in the calendar that opens. This information is sent to the translation provider as metadata of the translation package. |
| Team | If you are a member of multiple teams, select your team to use for this job. Note: Your team determines which source and target languages are available for selection in the Languages tab, described in the previous step, and the available translation providers, described below. |
| Notification | Select one of the following to specify which email addresses will receive notifications about this job: * All Users of Selected Team: The email addresses of all the users in the team specified above. This is the default selection. * Just Job Submitter: Your email address. * Specific Email Addresses: The email addresses specified in the **Emails** box, below. * an email notification group. For more information, refer to the Lionbridge App for Marketo Setup Guide. |
| Emails | The list of email addresses that will receive email notifications about this job. The selection in the Notification dropdown list, above, determines default list of email addresses. You can edit this list by adding, editing, and deleting email addresses. Each email address must be on a separate line. Tip: To save the list of email addresses as a new or updated group, click the Save as a new notification group button |
- Click Send to immediately send out the translation job to the specified translation provider.
You can monitor the job’s status on the Translation jobs page. For details, see Monitoring Translation Status.
Note: You can delete items from the Translation Queue. This is useful, for example, if you decide not to translate the item into the specified target language. To delete items from the queue, select the corresponding check boxes and click Delete selected items. A message box confirms that you want to delete the selected items from the Translation queue. Click OK to confirm.