Specifying Job Options and Submitting Your Job
4 minute read
Specifying Job Options and Submitting Your Job
The Translation Job page of the Bulk Translation wizard opens when:
- You click Next in the Options page of the wizard, if multiple translation providers are not configured for your team profile.
- You click Next in the LSP page of the wizard, if multiple translation providers are configured for your team profile.
To specify job options and submit your job for translation:
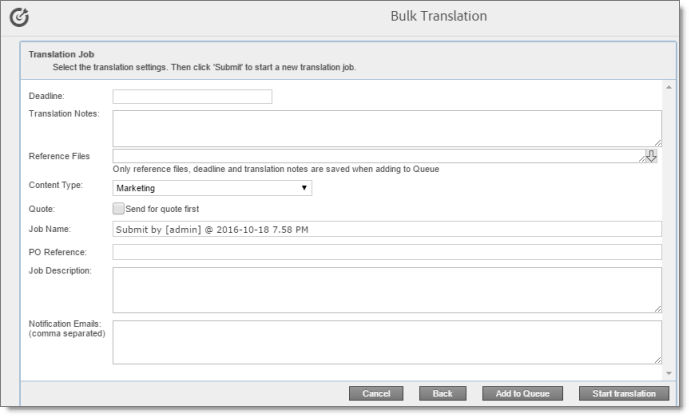
- In the Translation Job page of the wizard, enter the following information about the files to send out for translation:

| Option | Description |
|---|---|
| Deadline | The date you are requesting for the translated content to return. Click in the field and select a date in the calendar that opens. This information is sent to the translation provider as metadata of the translation package. Recommendation: Discuss whether to use this feature with your translation provider(s). |
| Translation Notes | Enter any additional information about this translation job. This information is sent to the translation provider as a comment in the metadata of the translation package. |
| Reference Files | You can send reference files (support assets) to your translation provider as part of a translation job. This provides helpful context for the translator. For instructions on adding reference files in Adobe Experience Manager, refer to the Adobe Experience Manager documentation for uploading digital assets: * version 6.2: https://helpx.adobe.com/experience-manager/6-2/assets/using/managing-assets-touch-ui.html * version 6.3: https://helpx.adobe.com/experience-manager/6-3/assets/using/managing-assets-touch-ui.html * version 6.4: https://helpx.adobe.com/experience-manager/6-4/assets/using/managing-assets-touch-ui.html * version 6.5: https://helpx.adobe.com/experience-manager/6-5/assets/using/managing-assets-touch-ui.html **Note:** This feature is available only if the **Allow Reference Files for Translation Job** check box is selected in the **UI and Default Settings** section of the **Configuration** page. For detailed instructions, refer to the Lionbridge Connector for Adobe Experience Manager Installation and Configuration Guide. ##### To add a reference file to the Connector: 1. Click the down arrow 2. Select the reference file or folder containing reference files and click **Select.** 3. Repeat the previous steps for each reference file or folder containing reference files that you want to include. The Connector will send all specified files and all files in the specified folders to the translation provider. |
| Content Type | You can tag the content in a translation job as a specific content type. Depending on your company’s configuration, the Content API Platform may send the content to a specific translation provider based on the content type. Select one of the following content types: * Marketing * Technical * Legal **Note:** You may see different content types if your company has configured custom content types. |
| Quote | Select this check box to inform the translation provider that you want to receive a quote before the translation process starts. Note: This check box is displayed only if the selected translation provider is configured to support providing a quote before the translation process starts. |
| Job Name | Your name for this translation job. By default this includes the username, date, and time when you created the job, for example: Submit by [admin] @ 2016-12-20 6.57 PM. This is stored in the CQJobName attribute in the XML that the Connector sends to the translation provider. |
| PO Reference | Enter the purchase order reference number. |
| Job Description | Additional information about this job. This is stored in the CQJobDescription attribute in the XML that the Connector sends to the translation provider. |
| Notification Emails | Enter one or more email addresses that will receive notification when the content leaves Adobe Experience Manager and when it returns to Adobe Experience Manager. Use a comma to separate multiple email addresses. |
| In-country Reviewer | Optional. This is generally the name of the localization reviewer, which is stored in the InCountryReviewer attribute in the XML sent to the translation provider. By default, this field is hidden. |
Note: If you want to send the selected items to the Translation Queue instead of sending them out directly for translation, click Add to queue. The Translation Queue opens. For details, see Submitting Content for Translation from the Translation Queue.
- Click Start Translation.
The Connector sends the translation job to the translation provider you specified.
The Job Details tab of the Translation Status page opens, where you can monitor the progress of your translation job. For details, see Monitoring Pages in a Translation Job and Viewing Translated Content.
For information about the events that occur when the Connector sends out content for translation, see Sending Content for Translation.