18 minute read
The Globalization Tool enables you to send multiple pages, digital assets, Content Fragments, Experience Fragments, and adaptive forms directly out for translation or to the Translation Queue. You can add pages from multiple site paths, and/or upload paths stored in CSV or XLS files. You can filter pages and assets by publication date, on time, off time, activation state, and page template.
Important: By default, this feature is hidden. To use the Globalization Tool, you must select the Show Globalization Tool check box in the UI and Default Settings section of the Configuration page. For detailed instructions, refer to the Lionbridge Connector for Adobe Experience Manager Installation and Configuration Guide.
Notes: You can submit Content Fragments, Experience Fragments, and adaptive forms for translation only using the Bulk Translation wizard or the Globalization Tool. You can configure the Connector to submit for translation Content Fragments that are referenced in pages, Experience Fragments, and adaptive forms by selecting the Translate Dependent CF check box in the Translation Settings section of the Configuration page. For detailed instructions, refer to the Lionbridge Connector for Adobe Experience Manager Installation and Configuration Guide.
Note: Depending on your company configuration, you can submit digital assets, such as PDF and JPG files, for translation, including asset metadata.
You can also use the Globalization Tool to perform Adobe Experience Manager actions on multiple pages and digital assets simultaneously. For detailed instructions, see Performing Actions on Multiple Pages and Digital Assets.
To send out pages and assets for translation via the Globalization Tool:
-
Do one of the following to open the Globalization Tool:
-
In the Touch-Optimized UI of Adobe Experience Manager, click the Tools icon
 and then click Lionbridge Connector in the Adobe Experience Manager rail. (This opens the Connector in a new browser tab.) Then, click Globalization Tool in the Lionbridge Connector rail.
 -
In the Classic UI of Adobe Experience Manager, scroll down and click Lionbridge Connector in the right pane. Then, click Globalization Tool in the Lionbridge Connector rail.
-
In your Web browser, navigate to /content/ctctranslation/advbulk.html on your Adobe Experience Manager instance.
-
The Globalization Tool opens.
-
Optional. If you are a member of multiple teams, then in the Profile dropdown list, select the team profile to use with the Globalization Tool. This displays the source and target languages and the translation providers specified for the team profile. To always use the selected profile with the Globalization Tool, click Set as default.
-
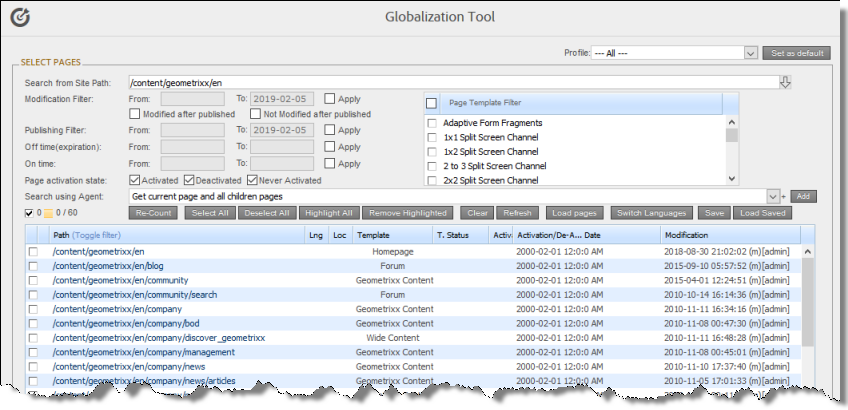
In the Select Pages section, you either set the parent path of one or more files to upload, apply filters, and then use an agent to upload the files, or you upload one or more files containing the paths of pages. You repeat this step until you have added all the paths and files to add. Do one of the following to select pages:
- To set the parent path of one or more files to upload, apply filters, and then use an agent to upload the files:
Note about team profiles: If one or more paths are configured for your team profile, you can select only pages that are in these paths for translation. The path configuration does not restrict your selection of digital assets.
a. In the Search from Site Path field, specify the highest root folder of all source pages or the full path of a page of a website. Either:
-
Click the arrow at the end of the field
 , navigate to that path, select it, and click Select.
 -
Type the path in one of the following formats: /content/geometrixx/en or
http://localhost:4502/content/geometrixx/en/company.html. For Content Fragments, or Experience Fragments, type the path in the following format: /content/dam/en. For adaptive forms, type the path in the following format: /content/forms/af.
Note: To send digital assets, including their metadata, for translation, the path is under the language root under /content/dam, for example: /content/dam/geometrixx/en/icons.
Tips: You can select a previously entered path. Alternatively, you can click Load Saved to load the last set of previously saved page paths to the list.
b. Optional. Specify any of the following filters:
| Filter | Description | How To Specify… |
|---|---|---|
| Modification Filter | The range of dates when the page was modified. | * In the From and To boxes, enter the dates in YYYY-MM-DD format. * Select the **Apply modification filter** check box. |
| Publishing Filter | The range of dates when the page was published. | * In the From and To boxes, enter the dates in YYYY-MM-DD format. * Select the **Apply publishing filter** check box. |
| Off time (expiration) | The range of dates when the page was off time, or unpublished. | * In the From and To boxes, enter the dates in YYYY-MM-DD format. * Select the **Apply offtime filter** check box. |
| On time | The range of dates when the page was on time. | * In the From and To boxes, enter the dates in YYYY-MM-DD format. * Select the **Apply ontime filter** check box. |
| Page template filter | The Adobe Experience Manager template used to create the page. | Select the check boxes for the templates to include, or select the check box in the list header to include all templates. |
Tip: For precise descriptions of some of these terms, refer to the Adobe Experience Manager documentation, available at: https://docs.adobe.com/docs/en/aem/6-2/author/page-authoring/publishing-pages.html.
c. Optional. In the Page activation state section, select one or more of the following activation states for the pages to include:
- Activated: The page has been activated (published).
- DeActivated: The page was activated (published) and then deactivated (unpublished).
- Never Activated: The page has never been activated (published).
d. In the Search Using Agent field, select an agent to collect items to send for translation. Select a custom agent or one of the following pre-configured agents from the list:
- Get current page: Default. The agent collects the root page of the path specified in the Search from Site Path box, above.
- Get all children pages: The agent collects all children pages of the path specified in the Search from Site Path box, above. It does not collect any pages in the root path.
- Get current page and all children pages: The agent collects the root page and all children pages of the path specified in the Search from Site Path box, above.
e. Click Add.
You can repeat these steps to add multiple sets of pages with different root folders to the list of pages.
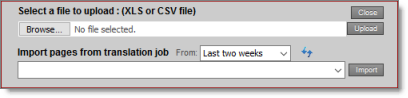
- To upload a file with the paths of the source content or import pages from a previously sent translation job, click the Load pages button:
Note: If an optional package is installed, you can upload an Excel file with the target languages for a translation job. For a description of the required formatting in the Excel file, see Importing Target Languages in the Globalization Tool. To obtain this optional package, contact Lionbridge Connector Support.
The Select a file to upload dialog box opens.
Do one of the following:
-
To upload a file with the paths of the source content:
a. Click Choose File.
f. In the browser dialog box that opens, navigate to the XLS or CSV file containing the paths of the source files, select it, and click Open, or similar, to close the browser dialog box.
The Select a file to upload dialog box displays the path of the file you selected.
g. Click Upload to upload the file.
A message box confirms that the file is added.
h. Click OK to close the message box.
The specified agent collects all items that match the search criteria and adds them to the list. You can repeat these steps to add additional files containing paths of pages to the list.
- To import pages from a previously sent translation job:
a. In the Import pages from translation job – From dropdown list, select the time range of previous translation jobs to display. The default value is Last two weeks.
b. Click the Refresh icon ![]() to populate the list of previous translation jobs in the list below.
to populate the list of previous translation jobs in the list below.
c. Select the previous translation job to import from the dropdown list at the bottom of the dialog box.
d. Click Import.
The Connectors adds the content items from the selected job to the list.
The following summary information is displayed in the Pages x/y field, where:
- X is the total number of pages available for selection.
- Y is the number of pages selected to send out for translation.
The following information is displayed about each page:
| Column | Description |
|---|---|
| blank | A locked padlock icon indicates if the page is locked. |
| Path | The path to the page. Tip: Click the link to open the page, fragment, or form in a new browser tab. The page opens in either the Touch UI or the Classic UI, depending on your company’s configuration. |
| Lng | The Adobe Experience Manager language of the page. |
| Loc | The Adobe Experience Manager locale of the page. |
| Template | The Adobe Experience Manager template used to create the page. * dam:Asset [CF] for Content Fragments * cq:Page for Experience Fragments * cq:Page [AF] for adaptive forms |
| T. Status | Optional. The custom translation status configured for the translation provider (LSP) that translated the page. Note: This column is displayed only if custom translation-status values are configured. For instructions, refer to the Lionbridge Connector for Adobe Experience Manager Installation and Configuration Guide. |
| Activation | Whether the page is activated or deactivated. |
| Activation/De-Activation Date | * The date and time when the page was last activated or de-activated, in the following format: YYYY-MM-DD kk:mm:ss, where kk is the hour represented by a 24-hour clock. * The username of the user who activated or deactivated the page. * One of the following codes, indicating whether the page was last activated or de-activated: * CTA: Activated * CTD: Deactivated. |
| Modification | * The date and time when the item was last modified, in the following format: YYYY-MM-DD kk:mm:ss, where kk is the hour represented by a 24-hour clock. * The (m) following the date and time indicates that the item was modified. The username of the user who last modified the item is displayed in parentheses, for example, [admin]. * One of the following codes, indicating how the page was last modified: * CTT: Translation * CTU: Update * CTI: Import* CTR: Rollout |
-
Select the check boxes for any pages you want to send out for translation. Ensure that the check boxes are cleared for any pages you do not want to send out for translation.
-
To update the numbers of selected pages, highlighted pages, and total pages at the top-left corner of the list, click Re-Count.
-
The number after the check box displays the number of selected pages.
-
The number after the highlight displays the number of highlighted pages.
-
The number after the slash ( / ) displays the total number of pages.
-
For example:

- To select the check boxes for all the pages in the list, click Select All.
- To clear the check boxes for all the pages in the list, click De-Select all.
-
Optional. Use the following features to update the list:
-
To remove all the pages from the list, even if the corresponding check boxes are selected, click Clear.
-
To update information about pages displayed in list, such as modification date, click Refresh.
-
-
Optional. To save the page paths displayed in the list, so that you can reload them later, click Save.
-
Optional. To view a page, click the path in the Path column. The page opens in a new browser tab.
-
In the Translation tab, specify the translation settings for the selected pages in the list.
![]()
Note: For a description of all other tabs, see Performing Actions on Multiple Pages and Digital Assets.
| Setting | Description |
|---|---|
| Source language | Select the source language for translation. The Connector will send pages in this source language for translation. |
| Target language | Select the check boxes for all the target languages into which you want to translate the source content. The list displays all the languages that are set up in Adobe Experience Manager for your team. * To select the check boxes for all available languages, click **All**. * To clear all selected check boxes, click **Clear**. |
| Deadline | The date you are requesting for the translated content to return. Click in the field and select a date in the calendar that opens. This information is sent to the translation provider as metadata of the translation package. Recommendation: Discuss whether to use this feature with your translation provider(s). |
| Translate Page Content? | Indicates whether to translate regular content fields in this content item. Important: To send out words on pages for translation, you must select this check box. |
| Translate Metadata? | Select this check box to send out for translation metadata fields that are defined in the Page Metadata Configuration section of the Advanced Settings page. These are properties under the /jcr:content node. |
| Use local TM? | This feature determines whether to check each component in the source version of the item for any content changes, and send only changed components out for translation. If a component was previously translated and it has not changed, then the Connector does not send it for translation again: Instead, it uses the stored translation. This feature reduces the quantity of content that the Connector sends to translation providers, which reduces your cost. However, it needs the Connector translation backup data, and it increases the Connector processing time before sending out the items for translation. * If this check box is selected, the Connector checks whether content was already translated before sending it out for translation. * If this check box is cleared, the Connector sends out content for translation without checking whether it has already been translated. |
| Notes | Enter any additional information about this translation job. This information is sent to the translation provider as a comment in the metadata of the translation package. |
| MSM Options | |
| Select if using Blueprint/Live-copy | This option is relevant when the target pages are MSM (Multi Site Manager) live copy pages, which means that Adobe Experience Manager automatically updates a target page when the corresponding source page changes. It prevents the Connector from overwriting unique source content that already exists in the target pages. This is useful when you are sending a page for translation that has been used in the past to push content to other pages, and includes target page content which has been changed, for example, regionalized. In this scenario you do not want to overwrite the regionalized content as the translation process occurs. Select this option when you do not want the Connector to overwrite components in the target pages that include regionalized content with the newly translated content. * If this check box is selected, the Connector does not overwrite unique source content that already exists in the target pages. * If this check box is cleared, the Connector does overwrite unique source content that already exists in the target pages. **Recommendation:** Select this check box if you are using the live-copy feature. |
| Only translate content from locked components | This option enables users to send out only content from locked components for translation. * If this check box is selected, users can send out content for translation only if it is from a locked component. * If this check box is cleared, users can send out content for translation whether or not it is from a locked component. **Note:** Locked components have an inheritance relationship between a source Blueprint page and the connected live copy page. When sending content for translation using Sidekick, users can choose whether to send for translation the content from locked components, which is inherited from a Blueprint component. This is useful if, for example, the page has both global and regional information and you only want to translate (replace) the global content that is created via a Blueprint page. In this scenario, suppose that the regional content on the page is manually translated in house, and that it has not changed. You would not want to tamper with it. However, using the same scenario, the global content from head office has changed and needs translation. You would select this check box to separate the content and localize only the new, inherited content. **Note about Blueprint pages:** If the **Pickup Content From Blueprint Pages** setting is specified, then the Connector always acts as though this option is selected, even if it is not selected. This occurs because only content from locked components are rolled out from Blueprint pages to Livecopy pages. For more information, refer to the Lionbridge Connector for Adobe Experience Manager Installation and Configuration Guide. |
| Unlock the component after translated content come back | This option automatically unlocks a component after translated content returns. This option is relevant only when the Select if using Blueprint/Live-copy is been selected. After translated content returns, it automatically unlocks a component, which breaks the MSM inheritance. Warning: This breaks the inheritance between the component and its Blueprint page, so that it no longer inherits new content. However, you can use the CTCRestoreOriginalSync workflow to relock the component and recreate the inheritance. For details, see Relocking Unlocked Components. * If this check box is selected, the Connector automatically unlocks a component after translated content returns. * If this check box is cleared, the Connector does not automatically unlock a component after translated content returns. |
| Allow translate content from Not-Sync components | This option enables users to send content for translation even if it is not synchronized. This means it does not have a relationship to a Blueprint page, so it cannot be synchronized with it. This can happen if you are not using the MSM (Multi Site Manager) feature of Adobe Experience Manager, or if this is a page with regionalized content that does not inherit content from a Blueprint page. * If this check box is selected, users can send out content for translation if it does not have a relationship to a Blueprint page. * If this check box is cleared, users cannot send out content for translation if it does not have a relationship to a Blueprint page. **Important:** The Connector treats certain page properties ( jcr:content, jcr:title, jcr:description) as unlocked page properties. Therefore, if you want the Connector to send these page properties for translation, you must select this check box.**Recommendation:** Select this check box if you are using either the live-copy or the language-copy features. **Note about Blueprint pages:** If the **Pickup Content From Blueprint Pages** setting is specified, then the Connector always acts as though this option is selected, even when it is not. This occurs because only content from locked components is rolled out from Blueprint pages to Livecopy pages. For more information, refer to the Lionbridge Connector for Adobe Experience Manager Installation and Configuration Guide. |
-
Do one of the following:
-
If you want to send the selected items to the Translation Queue instead of sending them out directly for translation, click Add to Queue. The Translation Queue opens. For details, see Submitting Content for Translation from the Translation Queue.
-
To immediately send out the selected items for translation as a single translation job, you must enter the following information in the Send for Translation Now section:
-
![]()
a. In the Choose LSP dropdown list, select your translation provider (LSP). If you select Lionbridge Freeway, the section expands to display additional fields.
![]()
b. Enter the following information about your translation job:
| Setting | Description |
|---|---|
| Special Instruction | Any additional instructions for Freeway, which are sent as metadata. Available only if the selected translation provider in the Choose LSP box, above, is the Lionbridge Freeway Type. |
| Analysis Code | The analysis codes for the translation. Displayed only if Lionbridge Freeway is selected in the Choose LSP box, above. You specify the analysis codes that are relevant to your content. Your Lionbridge setup determines which analysis codes are available for you to specify, and the values available for selection for each analysis code. In this example, the Color, Direction, and Sense analysis codes are available for you to specify. |
| Translation job name | Your name for this translation job. By default this includes the username, date, and time when you created the job, for example: Submit by [admin] @ 2016-12-20 6.57 PM. This is stored in the CQJobName attribute in the XML that the Connector sends to the translation provider. |
| Job description | Additional information about this job. This is stored in the CQJobDescription attribute in the XML that the Connector sends to the translation provider. |
| Reference Files | You can send reference files (support assets) to your translation provider as part of a translation job. This provides helpful context for the translator. For instructions on adding reference files in Adobe Experience Manager, refer to the Adobe Experience Manager documentation for uploading digital assets: * version 6.2: https://helpx.adobe.com/experience-manager/6-2/assets/using/managing-assets-touch-ui.html * version 6.3: https://helpx.adobe.com/experience-manager/6-3/assets/using/managing-assets-touch-ui.html * version 6.4: https://helpx.adobe.com/experience-manager/6-4/assets/using/managing-assets-touch-ui.html * version 6.5: https://helpx.adobe.com/experience-manager/6-5/assets/using/managing-assets-touch-ui.html **Note:** This feature is available only if the **Allow Reference Files for Translation Job** check box is selected in the **UI and Default Settings** section of the **Configuration** page. For detailed instructions, refer to the Lionbridge Connector for Adobe Experience Manager Installation and Configuration Guide. ##### To add a reference file to the Connector: 1. Click the down arrow 2. Select the reference file or folder containing reference files and click **Select**. 3. Repeat the previous steps for each reference file or folder containing reference files that you want to include. The Connector will send all specified files and all files in the specified folders to the translation provider. |
| PO Reference | The purchase order reference number for this translation job. |
| Content Type | You can tag the content in a translation job as a specific content type. Depending on your company’s configuration, the Content API Platform may send the content to a specific translation provider based on the content type. Select one of the following content types: * Marketing * Technical * Legal **Note:** You may see different content types if your company has configured custom content types. |
| Quote | Select this check box to inform the translation provider that you want to receive a quote before the translation process starts. Note: This check box is displayed only if the selected translation provider is configured to support providing a quote before the translation process starts. |
| Notification emails | Enter one or more email addresses that will receive notification when the content leaves Adobe Experience Manager and when it returns to Adobe Experience Manager. Use a comma to separate multiple email addresses. |
- Click Start translation.
The Connector sends the translation job to the translation provider you specified.
The Job Details tab of the Translation Status page opens, where you can monitor the progress of your translation job. For details, see Monitoring Pages in a Translation Job and Viewing Translated Content.
For information about the events that occur when the Connector sends out content for translation, see Sending Content for Translation.