11 minute read
You can use the Globalization Tool to perform actions on multiple pages and digital assets simultaneously, sometimes including multiple language copies of those items. You can perform the following action using the Globalization Tool:
- generate reports
- update page properties
- update DAM (digital-asset) metadata
- activate pages
- deactivate pages
- set future activation date of pages
- lock pages
- unlock pages
- create a new version of pages
- delete multiple pages and the corresponding translated pages
- import page content from XML
- export page content to XML
- copy page metadata
- run workflows
- roll out changes (MSM)
- create livecopy relationships (MSM)
- remove livecopy relationships (MSM)
For detailed instructions on sending out pages for translation using the Globalization Tool, see Sending Pages and Assets for Translation Using the Globalization Tool.
Important: By default, this feature is hidden. To use the Globalization Tool, you must select the Show Globalization Tool check box in the UI and Default Settings section of the Configuration page. For detailed instructions, refer to the Lionbridge Connector for Adobe Experience Manager Installation and Configuration Guide.
To perform bulk actions on multiple pages and digital assets:
- Do one of the following to open the Globalization Tool:
-
In the Touch-Optimized UI of Adobe Experience Manager, click the Tools icon
 and then click Lionbridge Connector in the Adobe Experience Manager rail. (This opens the Connector in a new browser tab.) Then, click Globalization Tool in the Lionbridge Connector rail.
 -
In the Classic UI of Adobe Experience Manager, scroll down and click Lionbridge Connector in the right pane. Then, click Globalization Tool in the Lionbridge Connector rail
-
In your Web browser, navigate to /content/ctctranslation/advbulk.html on your Adobe Experience Manager instance.
The Globalization Tool opens.
-
Optional. If you are a member of multiple teams, then in the Profile dropdown list, select the team profile to use with the Globalization Tool. This displays the source and target languages and the translation providers specified for the team profile. To always use the selected profile with the Globalization Tool, click Set as default.
-
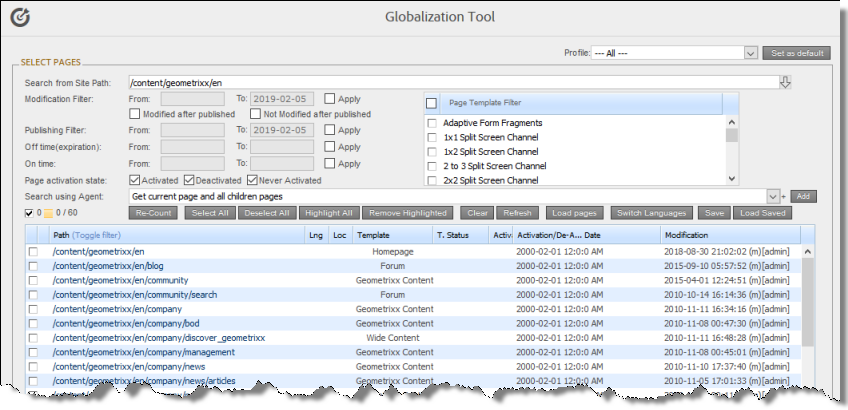
In the Select Pages section, you either set the parent path of one or more files to upload, apply filters, and then use an agent to upload the files, or you upload one or more files containing the paths of pages. You repeat this step until you have added all the paths and files to add. Do one of the following to select pages:
- To set the parent path of one or more files to upload, apply filters, and then use an agent to upload the files:
a. In the Search from Site Path field, specify the highest root folder of all source pages or the full path of a page of a website. Either:
-
Click the arrow at the end of the field
 , navigate to that path, select it, and click Select.
 -
Type the path in one of the following formats: /content/geometrixx/en or
http://localhost:4502/content/geometrixx/en/company.html.
Tips: You can select a previously entered path. Alternatively, you can click Load Saved to load the last set of previously saved page paths to the list.
b. Optional. Specify any of the following filters:
| Filter | Description | How To Specify… |
|---|---|---|
| Modification Filter | The range of dates when the page was modified. | * In the From and To boxes, enter the dates in YYYY-MM-DD format. * Select the **Apply modification filter** check box. |
| Publishing Filter | The range of dates when the page was published. | * In the From and To boxes, enter the dates in YYYY-MM-DD format. * Select the **Apply publishing filter** check box. |
| Off time (expiration) | The range of dates when the page was off time, or unpublished. | * In the From and To boxes, enter the dates in YYYY-MM-DD format. * Select the Apply offtime filter check box. |
| On time | The range of dates when the page was on time. | * In the From and To boxes, enter the dates in YYYY-MM-DD format. * Select the **Apply ontime filter** check box. |
| Page template filter | The Adobe Experience Manager template used to create the page. | Select the check boxes for the templates to include, or select the check box in the list header to include all templates. |
Tip: For precise descriptions of some of these terms, refer to the Adobe Experience Manager documentation, available at: https://docs.adobe.com/docs/en/aem/6-2/author/page-authoring/publishing-pages.html.
c. Optional. In the Page activation state section, select one or more of the following activation states for the pages to include:
- Activated: The page has been activated (published).
- DeActivated: The page was activated (published) and then deactivated (unpublished).
- Never Activated: The page has never been activated (published).
d. In the Search Using Agent field, select an agent to collect items to send for translation. Select a custom agent or one of the following pre-configured agents from the list:
-
Get current page: Default. The agent collects the root page of the path specified in the Search from Site Path box, above.
-
Get all children pages: The agent collects all children pages of the path specified in the Search from Site Path box, above. It does not collect any pages in the root path.
-
Get current page and all children pages: The agent collects the root page and all children pages of the path specified in the Search from Site Path box, above.
e. Click Add.
You can repeat these steps to add multiple sets of pages with different root folders to the list of pages.
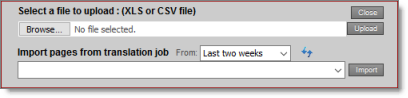
- To upload a file with the paths of the source content or import pages from a previously sent translation job, click the Load pages button:
The Select a file to upload dialog box opens.
Do one of the following:
-
To upload a file with the paths of the source content:
-
Click Choose File.
-
In the browser dialog box that opens, navigate to the XLS or CSV file containing the paths of the source files, select it, and click Open, or similar, to close the browser dialog box.
-
The Select a file to upload dialog box displays the path of the file you selected.
-
Click Upload to upload the file.
A message box confirms that the file is added.
- Click OK to close the message box.
The specified agent collects all items that match the search criteria and adds them to the list. You can repeat these steps to add additional files containing paths of pages to the list.
-
-
To import pages from a previously sent translation job:
a. In the Import pages from translation job – From dropdown list, select the time range of previous translation jobs to display. The default value is Last two weeks.
b. Click the Refresh icon
 to populate the list of previous translation jobs in the list below.
c. Select the previous translation job to import from the dropdown list at the bottom of the dialog box.
d. Click Import.
The Connectors adds the content items from the selected job to the list.
The following summary information is displayed in the Pages x/y field, where:
- X is the total number of pages available for selection.
- Y is the number of pages selected to send out for translation.
The following information is displayed about each page:
| Column | Description |
|---|---|
| blank | A locked padlock icon indicates if the page is locked. |
| Path | The path to the page. Tip: Click the link to open the page, fragment, or form in a new browser tab. The page opens in either the Touch UI or the Classic UI, depending on your company’s configuration. |
| Lng | The Adobe Experience Manager language of the page. |
| Loc | The Adobe Experience Manager locale of the page. |
| Template | The Adobe Experience Manager template used to create the page. |
| T. Status | Optional. The custom translation status configured for the translation provider (LSP) that translated the page. Note: This column is displayed only if custom translation-status values are configured. For instructions, refer to the Lionbridge Connector for Adobe Experience Manager Installation and Configuration Guide. |
| Activation | Whether the page is activated or deactivated. |
| Activation/De-Activation Date | * The date and time when the page was last activated or de-activated, in the following format: YYYY-MM-DD kk:mm:ss, where kk is the hour represented by a 24-hour clock. * The username of the user who activated or deactivated the page. * One of the following codes, indicating whether the page was last activated or de-activated: * CTA: Activated * CTD: Deactivated. |
| Modification | * The date and time when the item was last modified, in the following format: YYYY-MM-DD kk:mm:ss, where kk is the hour represented by a 24-hour clock. * The (m) following the date and time indicates that the item was modified. The username of the user who last modified the item is displayed in parentheses, for example, [admin]. * One of the following codes, indicating how the page was last modified: * CTT: Translation * CTU: Update * CTI: Import* CTR: Rollout |
- Highlight pages to apply actions from the tabs (in the bottom part of the page) to them. The tabs are described in step 8, below.
To highlight a page, click in the corresponding row.
Note: Do not click the actual path in the Path column, because that is a link to the page.
- To highlight multiple adjacent pages, press and hold the Shift key.
- To highlight multiple non-adjacent pages, press and hold the Ctrl key.
- To highlight all the pages in the list, click Highlight All.
- To remove the highlight all the pages in the list, click Remove Highlighted.
- Optional. Use the following features to update the page list:
- To remove all the pages from the list, even if they are highlighted, click Clear.
- To update information about pages displayed in list, such as modification date, click Refresh.
- To switch the language version of all highlighted pages in the list, click Switch Languages. A dialog box opens, displaying the available language versions. Highlight one or more languages, and click Switch.
Tip: This enables you to roll out content from secondary Blueprint pages to country pages. For example, you can roll out content from us-en to
xa-en(Asia English) and then fromxa-entokr-koand other country sites. To roll out content, you use the Rollout tab of the Globalization Tool, as described in Rolling Out Changes to Multiple Pages.
To save the page paths displayed in the list, so that you can reload them later, click Save.
-
Optional. To view a page, click the path in the Path column. The page opens in a new browser tab.
-
Specify settings for highlighted pages in the list in the following tabs:
Note: For a description of the Translation tab, see Sending Pages and Assets for Translation Using the Globalization Tool.
| Tab | Description | For Details, See |
|---|---|---|
| Reporting | You can generate the following Adobe Experience Manager reports about multiple pages: * **Field report:** Displays which of specified fields are in multiple pages, including multiple language versions of these pages. * **Lock report:** Displays which of multiple pages, including multiple language versions of these pages, are locked or unlocked. * **Content report:** Displays the relationships between multiple page paths and all associated language versions. * **Sitemap report:** Displays the sitemap relationships among multiple pages for all languages. * **Translation report:** Displays the translation history for a date range and specified LSPs (translation providers) and TMSs. |
Generating Reports about Multiple Pages |
| Page Property Updating | You can update page properties for multiple pages, including multiple language copies of those pages. | Updating Page Properties for Multiple Pages |
| DAM Metadata Update | You can update the metadata of multiple digital assets, including multiple language copies of those digital assets. | Updating Metadata of Multiple Digital Assets |
| Activation | You can perform the same action on multiple pages, including multiple language copies. You can perform the following types of actions: * activate pages * deactivate pages * set future activation date of pages * lock pages * unlock pages * create a new version of pages * delete pages and the corresponding translated pages * import page content from XML * export page content to XML |
Activating Multiple Pages and Digital Assets |
| Copy Metadata | You can copy metadata to multiple pages, including multiple language copies of those pages. This includes copying metadata from source Blueprint pages to the corresponding livecopy language copies of those pages. | Copying Metadata to Multiple Pages |
| Run Workflows | You can run workflows on multiple pages, including multiple language copies of those pages. | Running Workflows on Multiple Pages |
| Rollout | You can perform the following MSM (Multi Site Manager) tasks on multiple pages, including language versions of those pages: * rolling out changes from the source (Blueprint) pages to the target (live copy), including language versions of those pages * creating livecopy relationships from the source (Blueprint) pages to the target (live copy), including language versions of those pages * removing livecopy relationships between the source (Blueprint) pages to the target (live copy), including language versions of those pages |
Performing Rollout Tasks on Multiple Pages |