Creating a Custom Asset Handler
2 minute read
You can create a custom asset handler that modifies the translation settings of specific asset types. This can be useful, if for example, you want to change settings for a type of digital assets that you send for translation. For example, suppose that when you translate video subtitles, you do not want to use the Language Mapping configurations to convert the path of the source subtitle text files to the path of the target files. Instead, you want the translated video subtitle text files to be in the same location as the source video subtitle text files, but you want to change the name of the translated subtitle files.
In this scenario, you can now create a custom asset handler to configure a custom path mapping for converting source paths to target paths. For example, you can convert /content/dam/wwww/us/en/…/video/subtitle/12345_us_en_xxxxx.txt to /content/dam/wwww/us/en/…/video/subtitle/12345_fr_fr_xxxxx.txt, instead of to /content/dam/wwww/fr/fr/…/video/subtitle/12345_us_en_xxxxx.txt
To create a custom asset handler:
- Click Admin Tools > Asset Handlers in the Lionbridge Connector rail to open the Custom Asset Handlers page. For information on opening the Lionbridge Connector rail, see Configuring the Connector.

- Click Add in the top-right corner of the page to add a new custom asset handler.
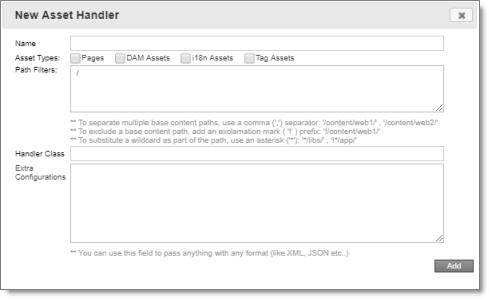
The New Asset Handler dialog box opens.
-
In the Name field, enter the name for the new custom asset handler.
-
In the Asset Types section, select the check boxes of the asset types for which this asset handler is relevant.
-
In the Path Filters box, you can specify the base content path of the assets for applying this custom handler. By default, the value is /, so it is relevant to all paths.
- To specify multiple base content paths, use a comma ( , ) separator between the paths, for example: /content/web1/ , /content/web2/.
- To exclude a base content path, use an exclamation mark ( ! ) prefix, for example: !/content/web1/.
- To substitute a wildcard for part of a base content path, use an asterisk ( * ), for example: */libs/or !*/app/.
- To specify multiple base content paths, use a comma ( , ) separator between the paths, for example: /content/web1/ , /content/web2/.
-
In the Handler Class field, enter the full class name of your custom asset handler, as instructed by Lionbridge Connector Support. For details, see How to Contact Lionbridge Connector Support.
Note: You must also deploy your handler bundle to Adobe Experience Manager.
- In the Extra Configurations box, enter any additional configuration for this custom handler, such as XML or JSON.
- Click Add to save your changes and close the dialog box.